Learn How to Write with a Brush Pen
Book 2: Regular Script
Wang Ronghua
Opening Remarks
I presume all of you have gone through Book 1, which is a general introduction to Chinese calligraphy;
I presume all of you have a fundamental grasp of the Chinese language;
I also presume all of you have an impulse to learn how to write with a brush pen;
I also presume you are all determined to master the skills;
I also presume you are all mentally prepared to devote a lot of time for practice.
If all my assumptions are right, you will finish this book with a firm grasp of skills of writing regular script. Official script and free hand are for further studies if you are still interested after the sessions on regular script.
Stone Inscription on Garrison Army by Liu Gongquan
Liu Gongquan (柳公权778-865) a most famous calligrapher of late Tang.
This piece (in Chinese “神策军碑[shen ce jun bei]) of work was written by Liu when he was 66 to mark the Emperor’s inspection of the army. This piece, the best of Liu’s regular script, has been taken as a model for generations.
How to Hold a Brush Pen
The way to hold a brush pen
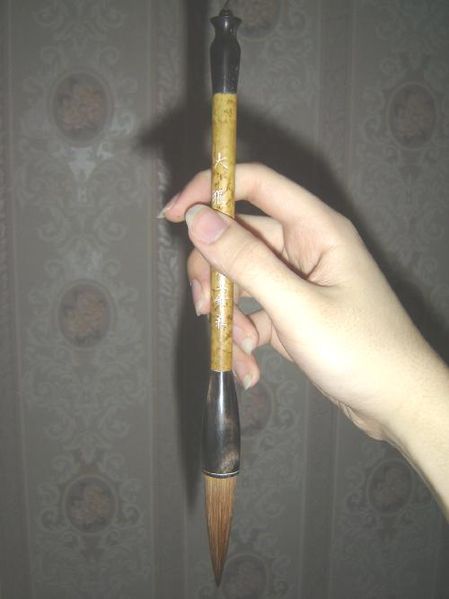
The brush is held vertically straight gripped between the thumb and middle finger. The index finger touches the upper part of the shaft of the brush (stabilizing it) while the ring and little fingers tuck under the bottom of the shaft. The palm is hollow, and you should be able to hold an egg within that space. This method, although difficult correctly for the beginner, allows greater freedom of movement, control and execution of strokes.
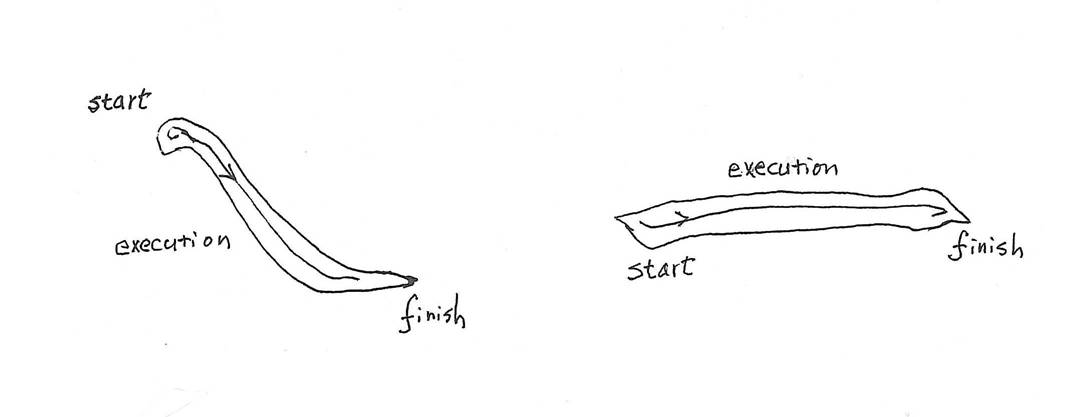
Three Key Links in Using a Brush Pen
The 3 links are:
1. Starting the stroke;
2. Executing the stroke;
3. Finishing the stroke.
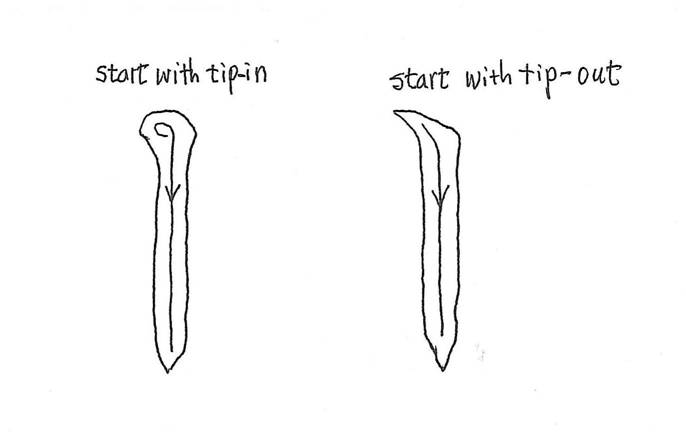
There are two ways to start a stroke:
A stroke with tip-in; A stroke with tip-out
The middle part of the brush is used to execute the stroke in four ways:
1. to raise the brush a little bit;
2. to press down the brush lightly;
3. to press down hard;
4. to press down first and then raise the brush to allow the twist of the tip.
Three Key Links in Using a Brush Pen
There are several ways to finish a stroke as indicated below:

Kinds of Strokes
In general strokes are divided into 8 kinds:
1. dot;
2. horizontal stroke;
3. vertical stroke;
4. hooka
5. left stretching stroke;
6. right stretching stroke;
7. an elbow;
8. an up-ward stroke.
Structure of a Character
Structure of a character refers to the way strokes are composed to form a character. In regular script, generally speaking, the character should look even and upright, vertical, left and right stretching strokes can be extended while horizontal strokes should be contained.
After you have laid a solid foundation, you can try some “risky” strokes, and then find a new balance and make the character look even and upright again.
Characters are divided into those with radicals and those without.
Those with radicals break into 6 categories, namely: (1) left and right; (2) upper and lower; (3) left, middle and right; (4) upper, middle and lower; (5) wholly enclosed; (6) semi-enclosed.
Placing of White Space and Density of Strokes
Placing white space refers to the comparison between black strokes and the white space left and the white space between characters and lines. Leaving a proper white space on the paper gives a holistic beauty;
Attention should also be paid to the density of strokes, and come to know where strokes should be kept apart or closer.
Inter-relations among Strokes and Charm
Inter-relations among strokes refer to the final posture of the composition of strokes, that would include placing of white space, directions strokes face, open or closed parts and etc.
Charm is usually produced by a combination of the calligrapher’s concept and his skills; such a combination can also projects the state of mind of the calligrapher.
Imitation and Copying
All calligraphers, almost with no exception, started their learning from imitating or copying widely recognized rubbings from stone inscriptions and model calligraphy on paper.
To imitate is to try to write the strokes and follow the structure of the rubbing that is placed before you as closely as possible.
To copy is to write, on a rather transparent paper over a model, as closely as the characters on the model.
You got to read the rubbings or models first before imitation, and study how the strokes are written and what the structure is.
When you imitate for the first time you should get the strokes right;
When you imitate for the second time you should get the structure right;
When you imitate for the third time you should get as closely as possible to the sample;
When you imitate for the fourth time you should ensure the strokes and structure look full and beautiful;
When you imitate for the fifth time you should instill liveliness into your writing.
Sometimes you may have to enlarge or minimize the rubbings or models in order to imitate properly;
Some people imitate the entire rubbing or model;
Some people memorize the whole rubbing or model and imitate without looking at them.
Some people imitate in their minds without actually writing down on paper.
There are three ways of copying:
One is to fill in the ink onto the double contour lines of a character;
One is to copy from the sample underneath your paper;
The other is to cover the red color strokes with black ink.
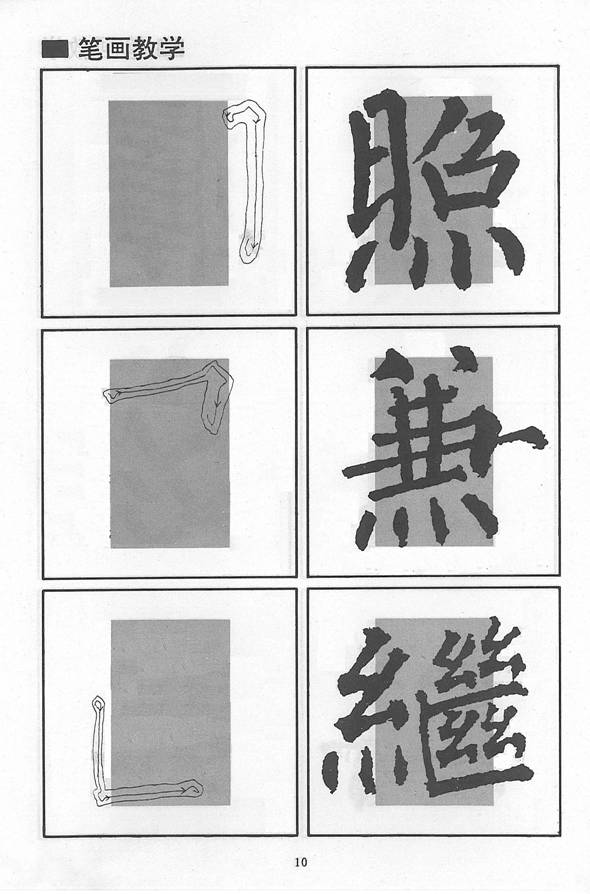
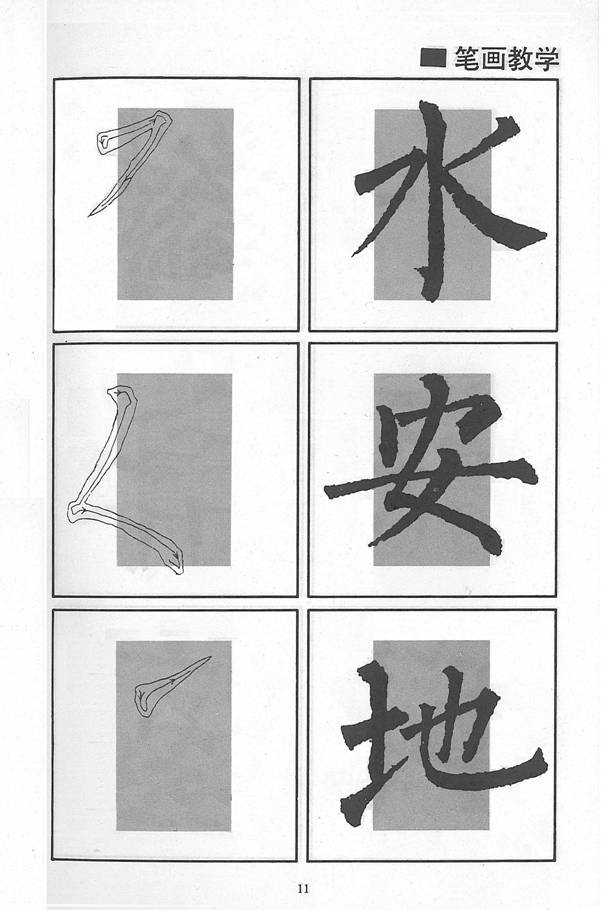
Teaching of Writing Strokes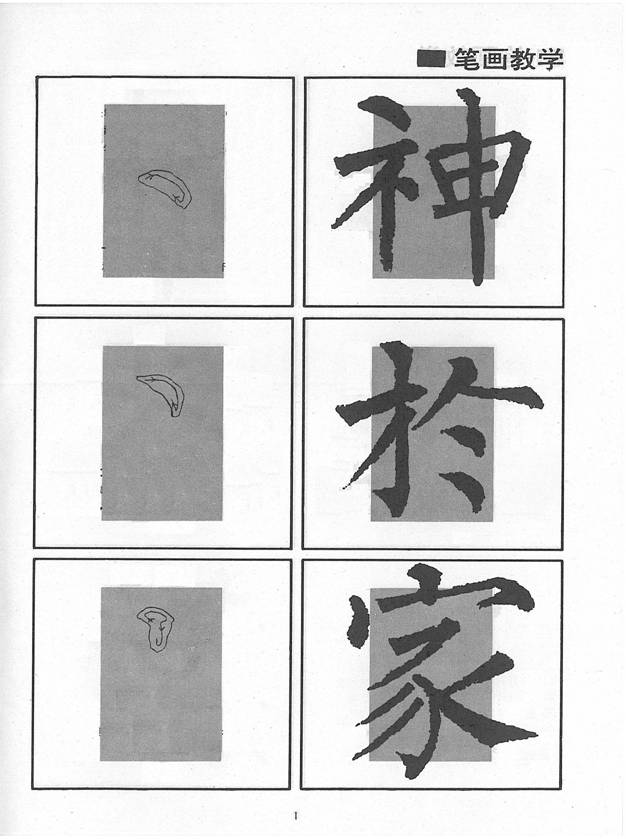
The top row of boxes is to show how to write a slanting dot: start with tip-out, move to lower right and pause lightly and finish with tip-in.
The second row of boxes is to show how to write another kind of slanting dot: start with tip-out, press down to the right and while moving downward raise the pen up gradually and finish with tip-in.
The lower row of boxes is to show how to write a vertical dot: start with tip-in, press down slightly to the right and then move down ward and finish with tip-in.
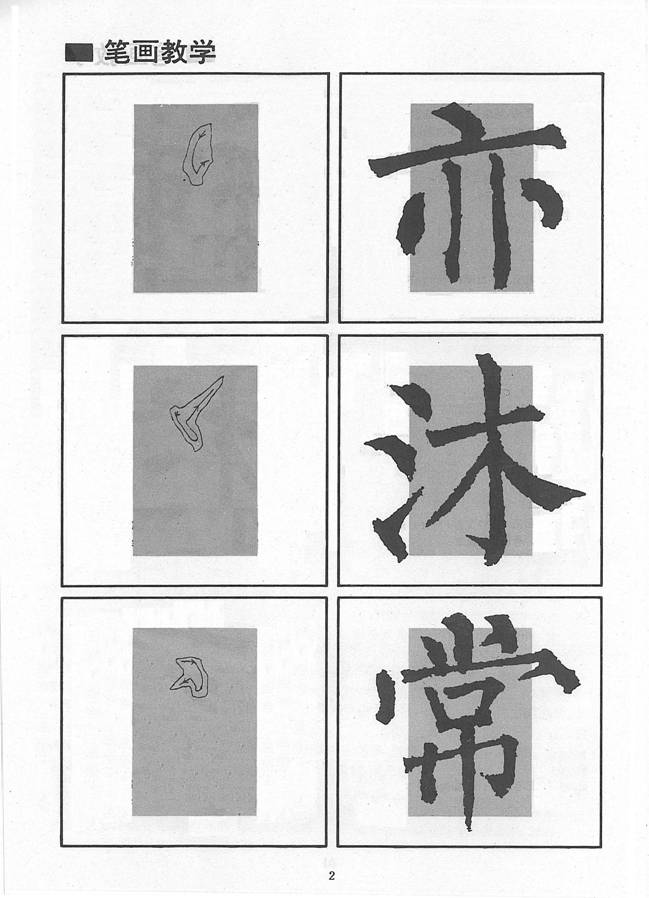 The top row of boxes is to show how to write a left dot: start with tip-out, press down lightly to the left, then turn to lower right, turn the tip up and then finish to the upper right by raising the pen slightly.
The middle row of boxes is to show how to write an up stretching dot: start with tip-out, press down to the lower right, revert back and press down slightly and then finish by raising the pen to the upper right.
A down ward dot: start with tip-out, press down to the lower right, raise the pen a bit and finish from lower left.
 Long horizontal stroke: start with tip-out, press down slightly and raise up a bit, then move to the right (slightly up-ward), the pen should raise up a little in the middle, raise up the tip at the right end, press down to lower right and finish with tip-in.
Short horizontal: start with tip-out, press down and twist the tip to the right (slightly up-ward), press down lightly and finish with tip-in.
Short horizontal: start with tip-out, move to the right, increase strength gradually, then raise a bit and press down, finish with tip-in.
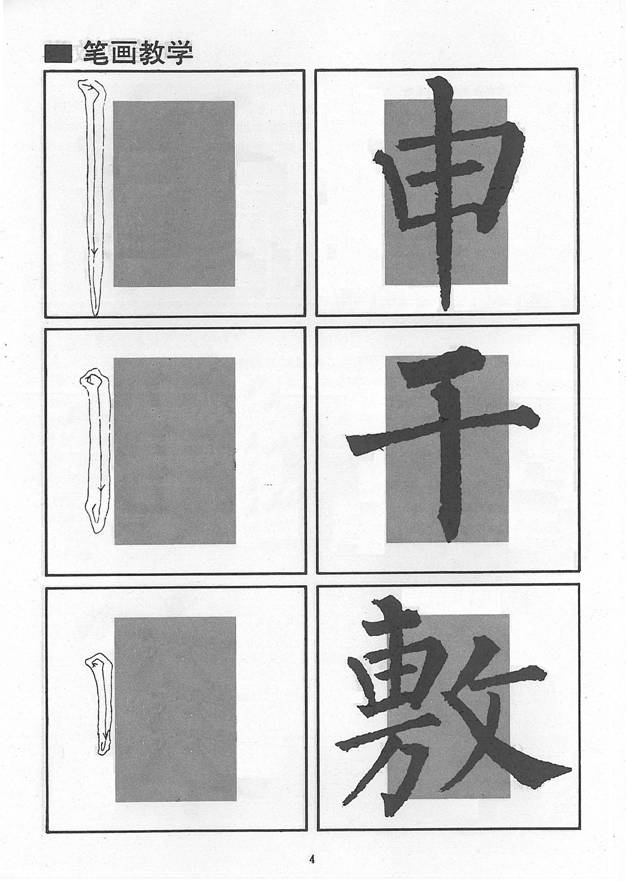
A hanging needle: start with tip-out, move to lower right, press down, twist the tip and go down, decrease strength gradually, raise the pen slowly and finish off.
A pendent dew: start with tip-in, press down to the right, then move down with a little curve, pause, raise up and finish with tip-in.
Short vertical: start with tip-in, press down to the right, move down steadily, pause, finish with tip-in.
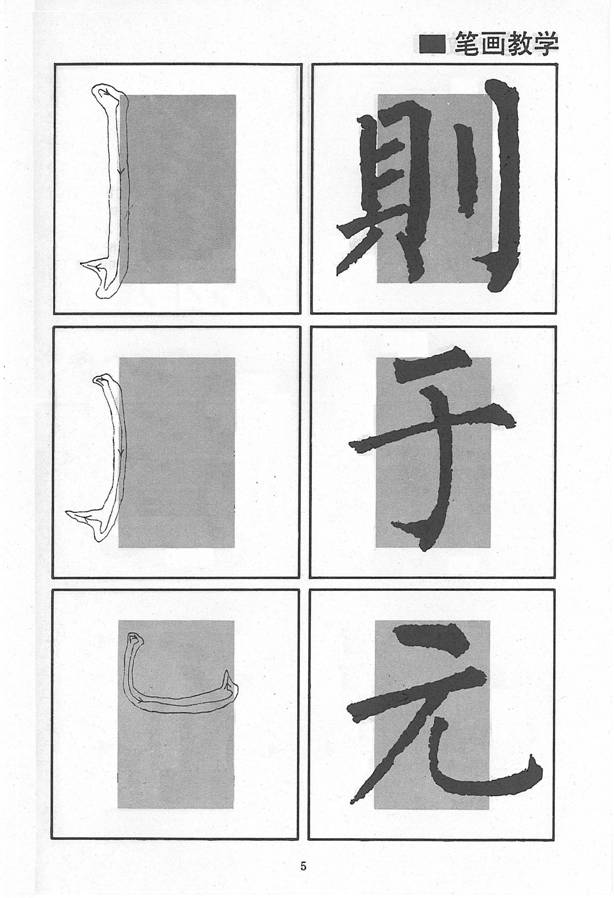 A vertical hook (1): start with tip-in, press down to the right and go down, pause at the lower end, pause, raise up a little, finish off to the left.
A vertical hook (2): start with tip-in, press down to the right and go down with a curve, pause at the lower end, twist the tip, finish off to the left.
A hook with a vertical start: start with tip-in, go down, move to the right, pause, twist the tip and finish off upward.
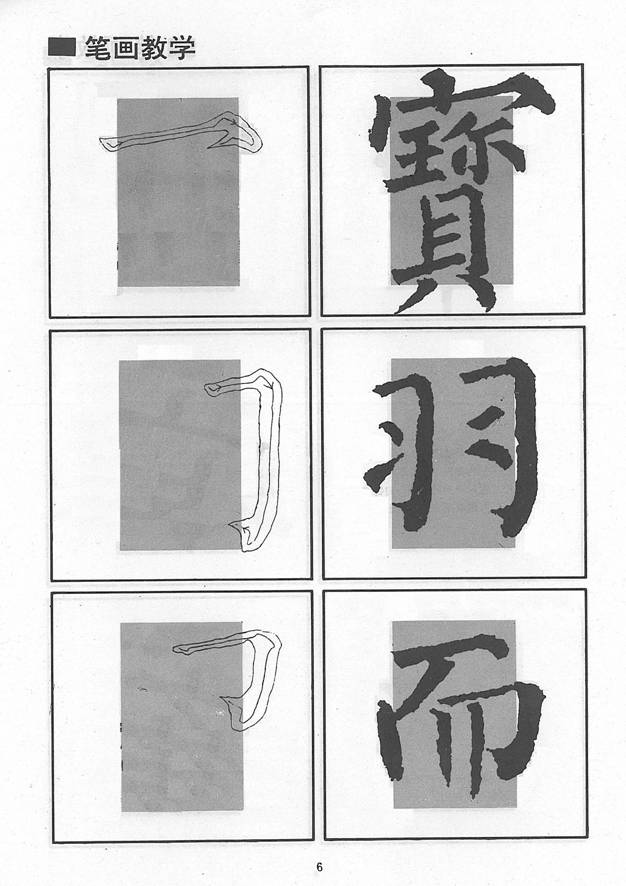 A horizontal hook: start with tip-out, pause and move to the right, raise up at the right end, then press down hard, twist the tip and finish off from lower left.
A hook with a horizontal start (1): start with tip-out, move to the right and raise up gradually, then press down to lower right, go down, press down at the lower end and finish with tip-out to the left.
A hook with a horizontal start (2): start with tip-out, pause, then move to the right, reduce strength gradually, raise up a bit at the bend, press down to lower right, go down, press down at lower end and finish with tip-out to the left.
A hook with lower arm bends inward: start with tip-out, move to the right, reduce strength gradually, raise up a bit at the corner, press down to lower right, move down with an inward bend and finish with a tip-out.
A long slanting hook: start with tip-in, press down and move down to the lower right with a slight bend, raise up at the end and finish off to upper right.
A sleeping hook: start with tip-out, move down to lower right with a bend, increase strength gradually, raise up at the end and finish off to the upper left.
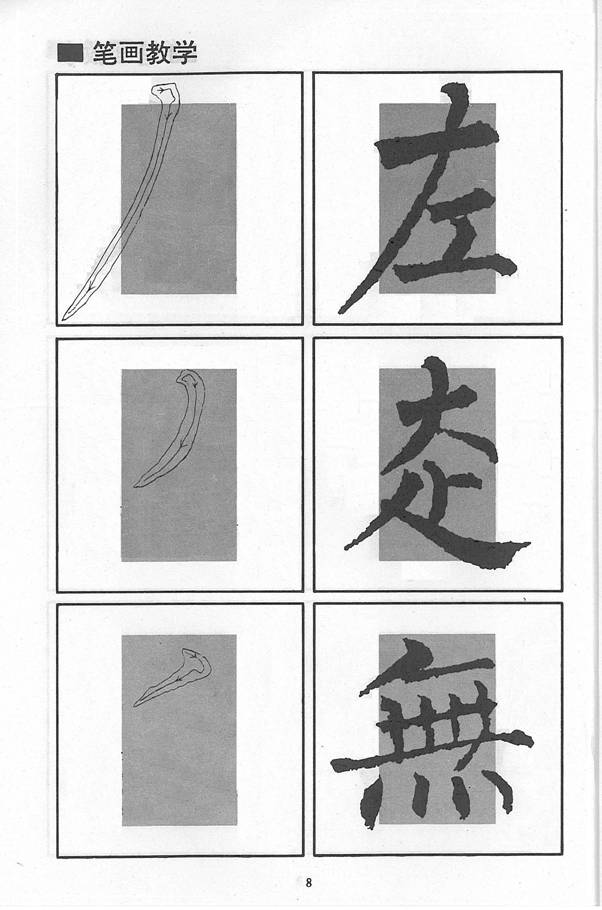 A long left stretch: start with tip-out, press downward, move to lower left, reduce strength gradually with a slight bend, raise up slowly and finish with tip-out.
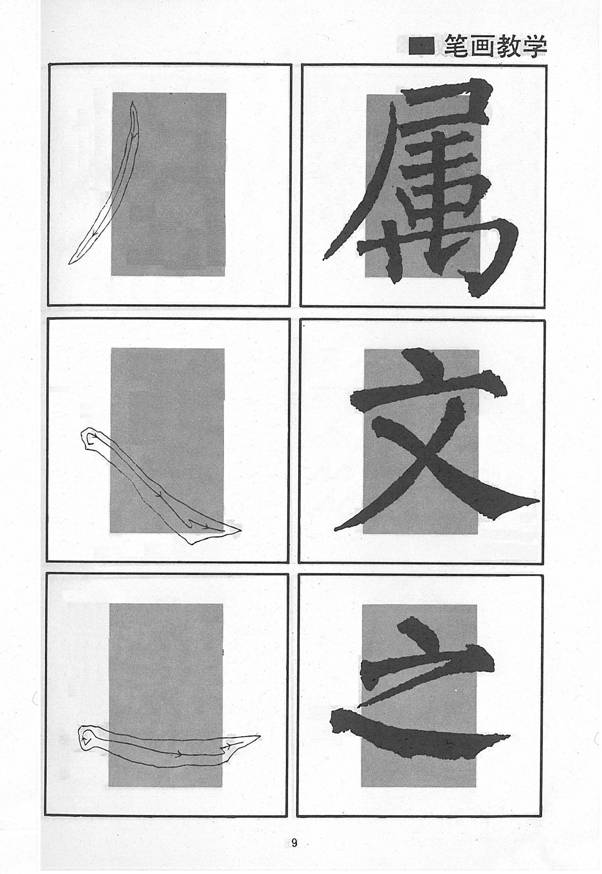
A short left stretch (1): start with tip-in, press down lightly, move to lower left, reduce strength gradually with a bend, raise up slowly and finish with tip-out.
A short left stretch: (2): start with tip-out, press down hard to the lower right, move to lower left, reduce strength gradually, finish off quickly with tip-out.
 A waning moon: start with tip-out, move to lower left, with more strength in the middle, raise up slowly and finish with tip-out.
A slanting right stretch: start with tip-in, press down, move to lower right, increase strength gradually, twist the tip at the lower end, press down and finish off slowly with tip-out.
A flat right stretch: start with tip-in, pause, twist the tip and move to the right, increase strength gradually with a slight bend, twist the tip at the end and finish off slowly with tip-out.
An elbow with a horizontal start (1): start with tip-out, pause and move to the right, raise up a bit and press down to the lower right, go down with a slight bend and finish with a tip-in.
An elbow with a horizontal start (2): start with tip-out, twist the tip, pause and move to the right, raise up a bit at the corner and press down, then move to lower left, finish with tip-in.
An elbow with a left start: start with tip-in, pause and move down, raise up a bit at the corner and move to the right, press down at the end and finish with tip-in.
 An elbow with a left stretch: start with tip-in, press down and move to upper right, reduce strength gradually, raise up a bit at the bend, press down lightly and finish off to the lower left.
A left stretch with a lower arm bends to the right: start with tip-in as a left stretch, twist the tip to the left at the bend, then move to the lower right, increase strength gradually, finish with a tip-in.
A longer upper right tip: start with tip-out, press down to the lower right, move to upper right and finish off.
More to Writing a Dot
Aside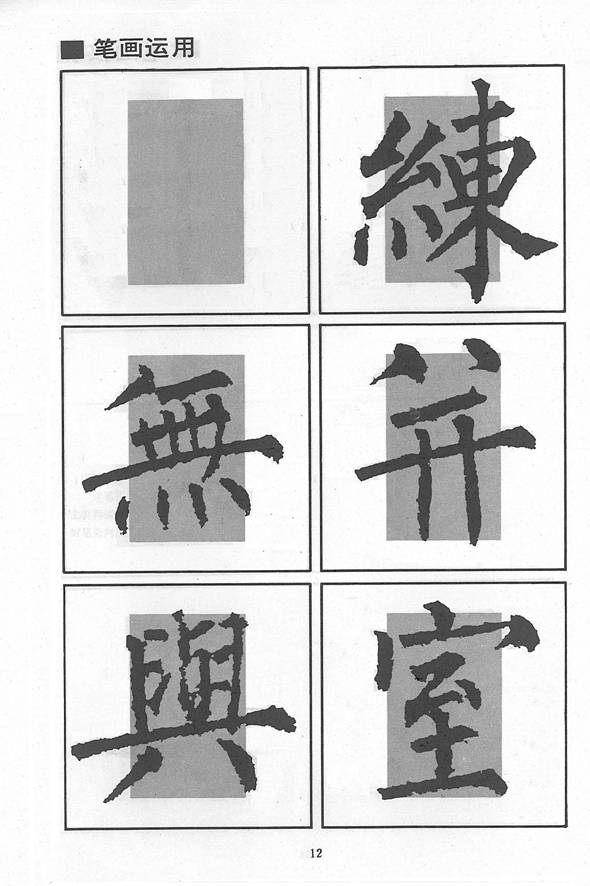 from the basics we have gone through, attention should also be paid to direction, slanting, strength, size and relationship with other strokes. Look at the characters in the sample carefully and try to master the rule for writing a dot.
More to Writing a Horizontal
Th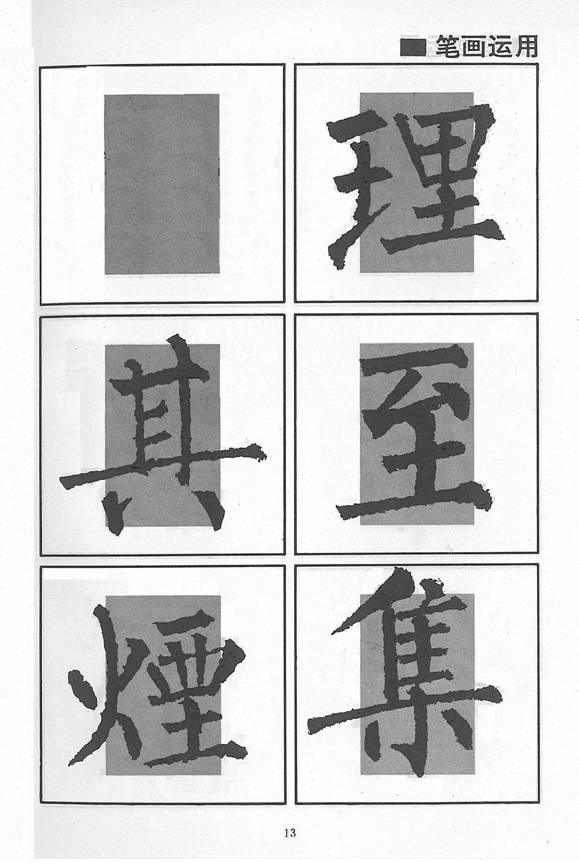 e ways of writing a horizontal vary from bold or otherwise, square or round to long or short; there are also varied ways for start, finish and execution. Study the characters in the sample carefully. In one character a horizontal may appear more than once, you have to be sure of which is longer, which is shorter, which is level, which is slanting, how to start and finish and the collocation of strokes.
More to Writing a Vertical
 A vertical is a pillar, which props up the character. A hanging needle does not vary much, the key is at its start; yet, the pendent dew can vary a great deal, mostly in execution and finish in whether or not the vertical is straight or bend, press down and raise up, the direction compared to other strokes; if when two verticals or one vertical and one vertical hook appear in the same character, you have to be sure of which one is longer or bold.
More to Writing a Hook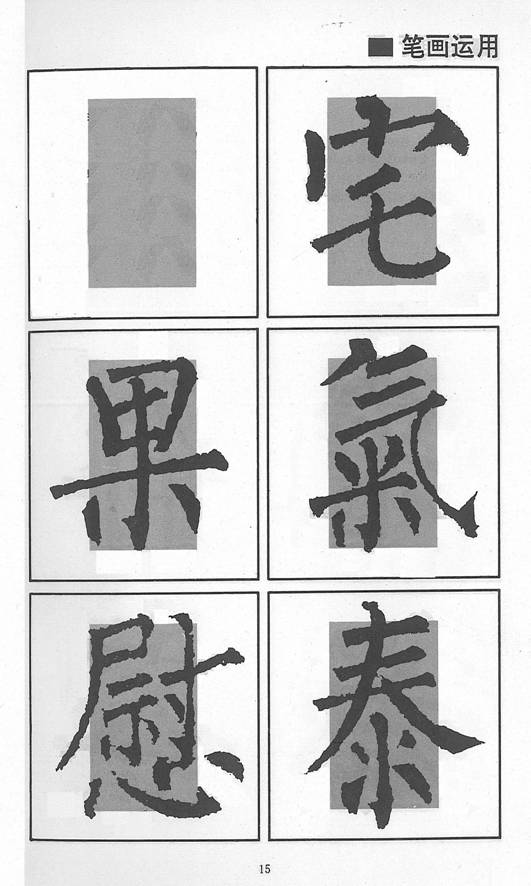
It would be too difficult to write a hook if you:
1) know the angle of slanting and bend;
2) have mastered how to twist the tip in elbows with horizontal and vertical starts;
3) are clear of the direction of finishing off.
More to Writing a Left Stretch
Unlike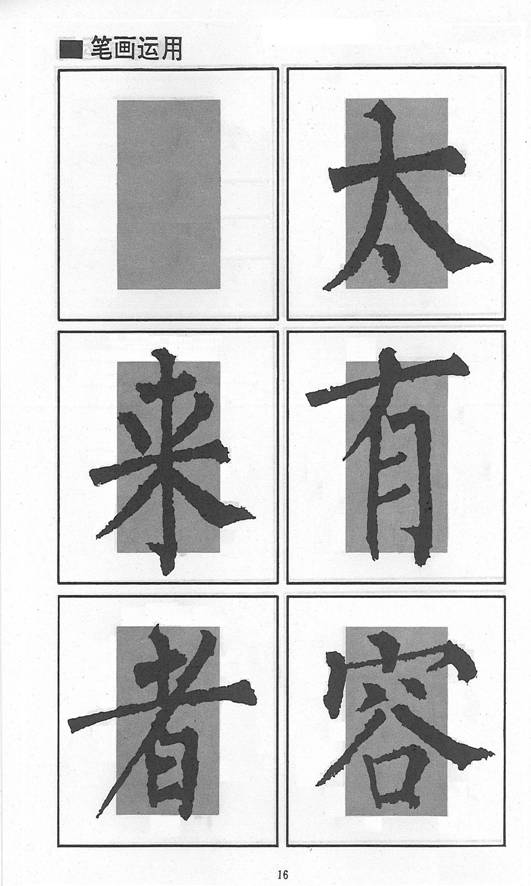 a long left stretch, a shorter one should be contained, is usually bold. The degrees of curving vary from character to character. Attention should also be directed to a holistic balance, especially when there is also a right stretch.
More to Writing a Right Stretch
 A right stretch is the main stroke in many characters. In Liu’s style, it is usually bold and contains more strength and written with a slower pace; the difficult is at finishing, which should be somewhat contained.
More to Writing an Elbow
 There are many ways to write an elbow, but the method is more or less the same. In Liu’s style, it can be broken into two strokes. The key lies in how to make the turn natural when writing in one stroke.
More to Writing an Upper Right Tip
 It is a simple stroke without too many varieties. We should be careful with the relationship between the finish and the start of the next stroke.
Structure
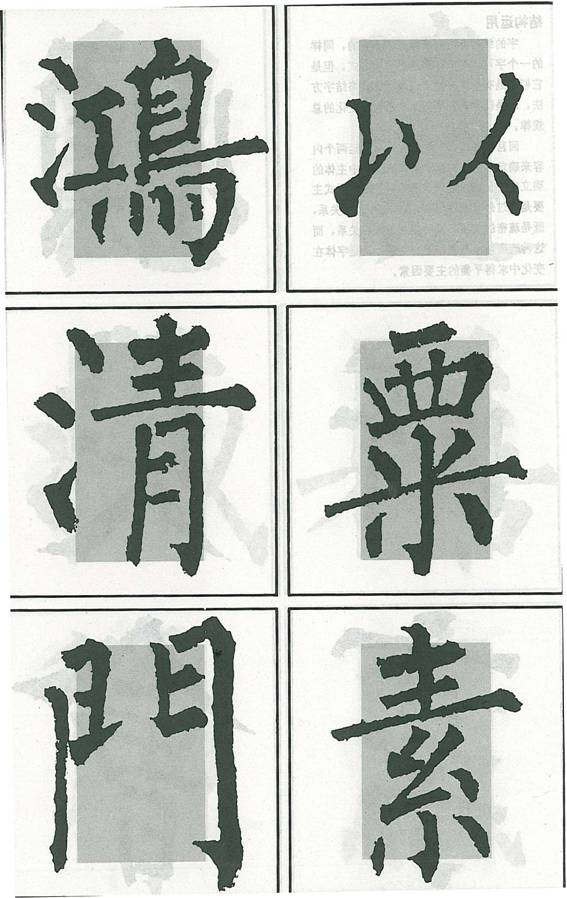
Before we touch on structure, I wish to with to the say a few words on the “two boxes” appeared in the previous slides. This is a new approach for learning Chinese calligraphy, invented by Mr. Yang Weiguo to facilitate beginners to master skills of structure. It is new a state patent. The inner box is a vertical rectangular and the outer box is a square. It has been proven to be a simple and easy approach.
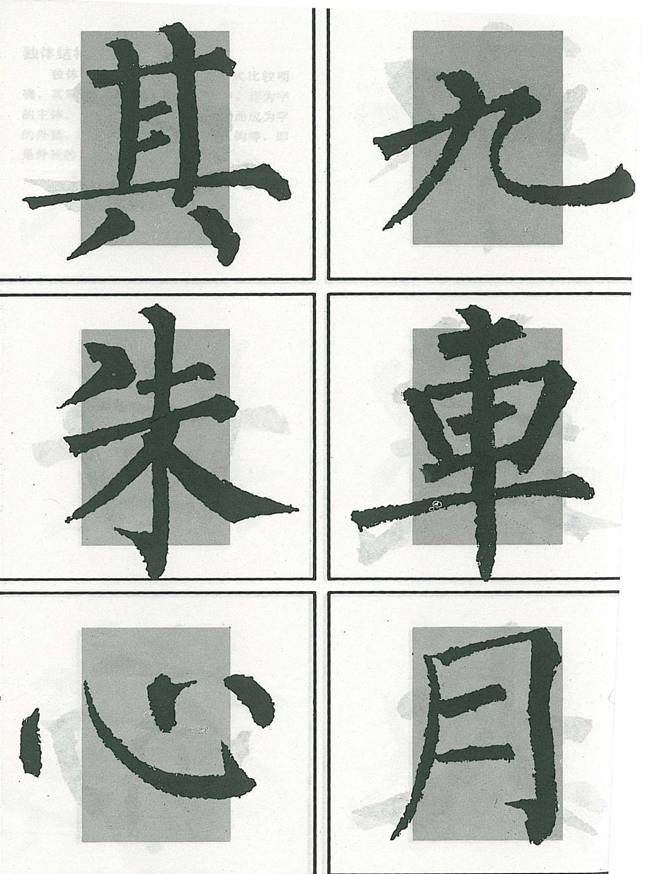
Structure—Characters without Radicals
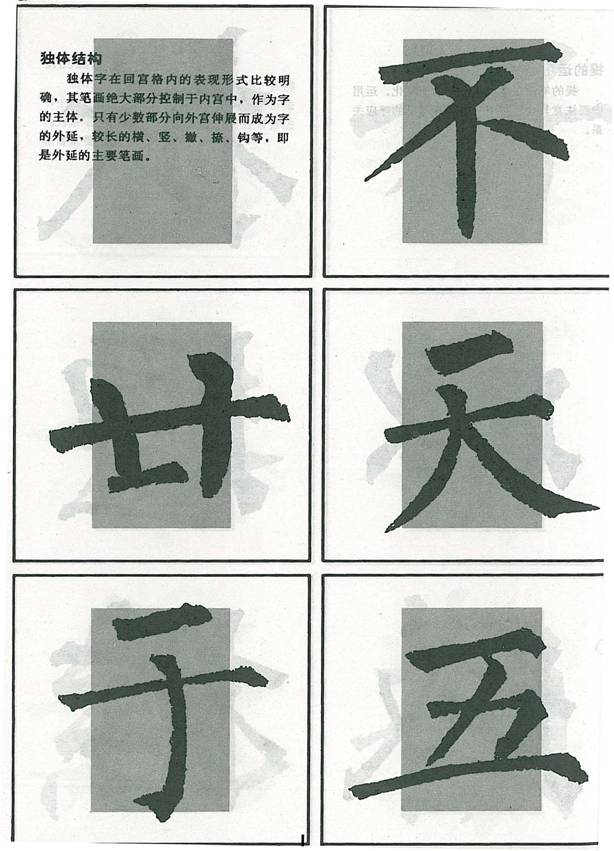 For stand alone characters, most part of it should be contained in the inner box, only a small part reaches out of it, for instance, the ends of horizontal, vertical, left and right stretches and a hook.

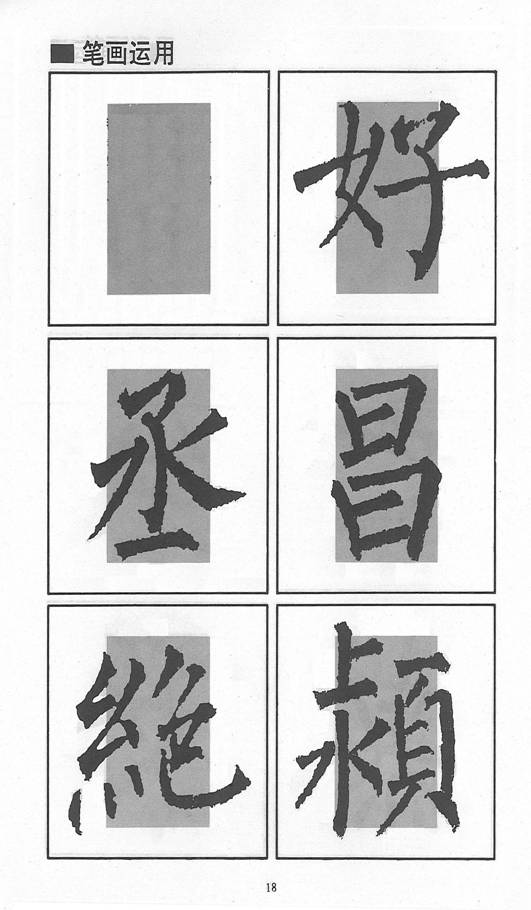
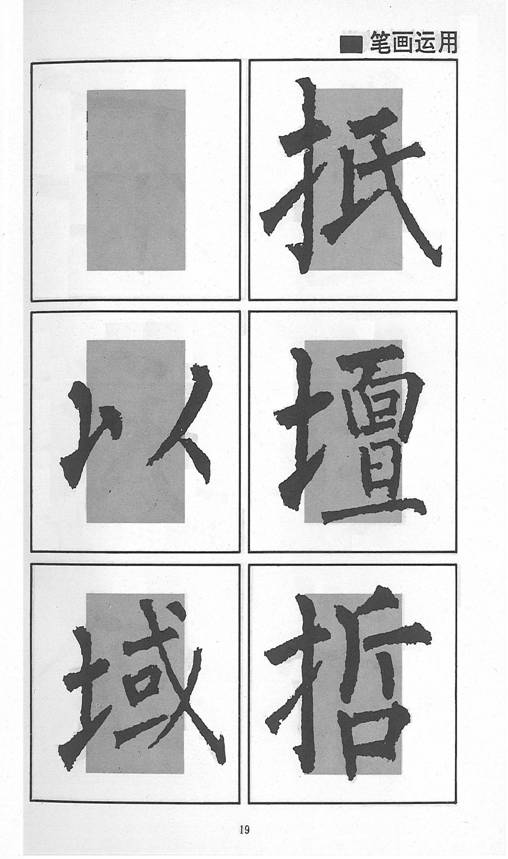
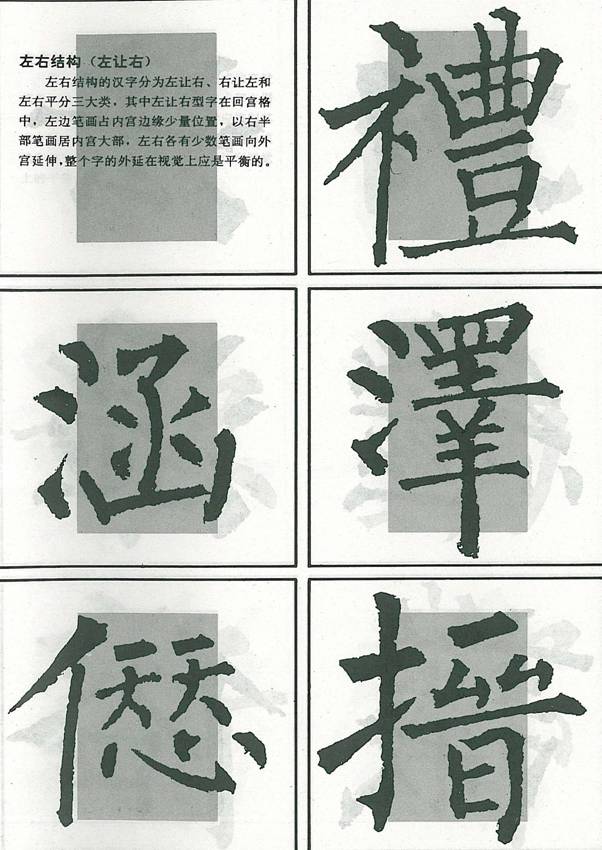
Structure—Left and Right Radicals (the Left Gives Way to the Right)
There are three kinds in a left and right structure, namely the left gives way to the right; the right gives way to the left and two equal halves.
In the first category, the left radical only occupies a tiny space on the edge of the inner box while the right occupies most part of it. Only a few strokes extend outside the inner box. The whole character should look balanced.
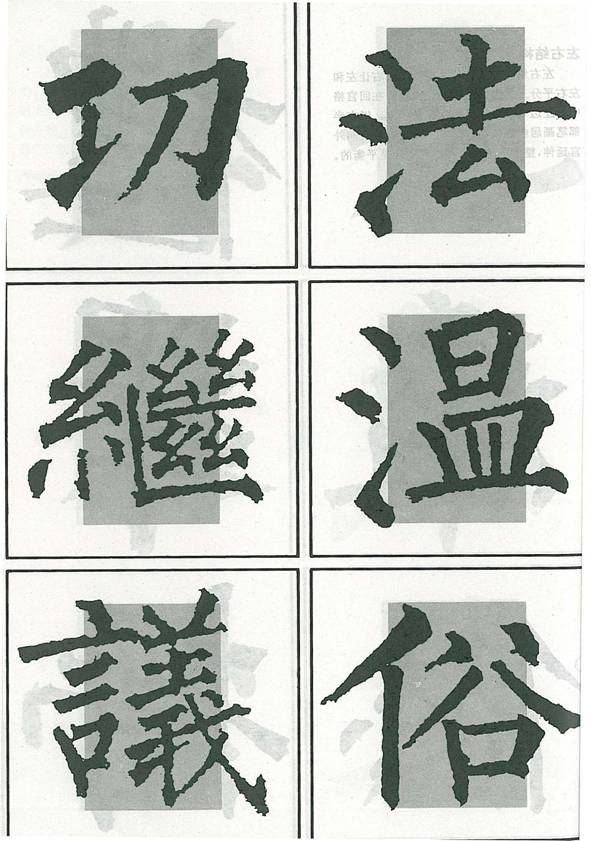
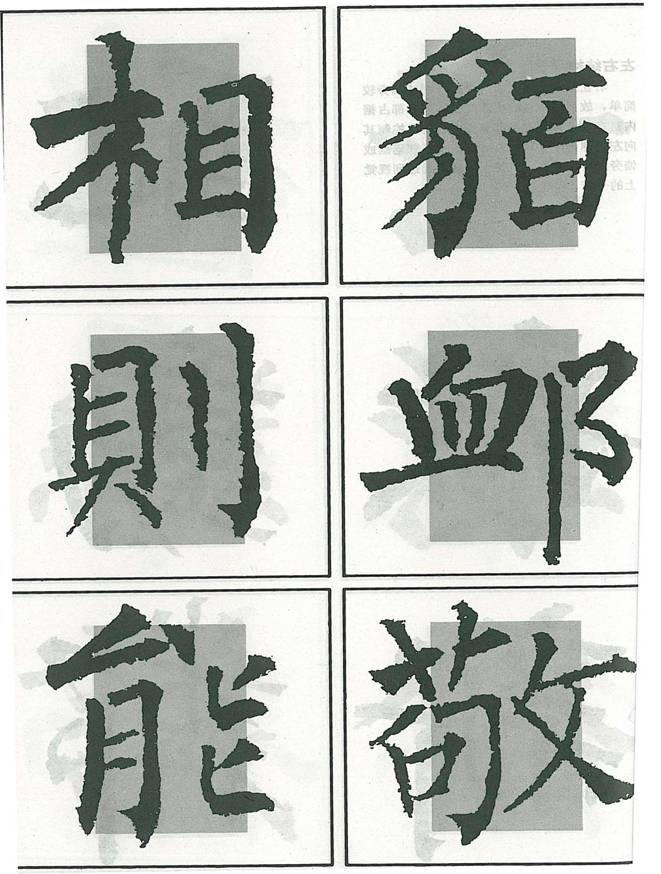
Structure—Left and Right Radicals (the Right Gives Way to the Left)
The right radical occupies a tiny part of the inner box while the left takes up a larger part; try not to intrude to the left too much; the left should look relaxed and easy; parts extend out of the inner box should not break the whole balance.
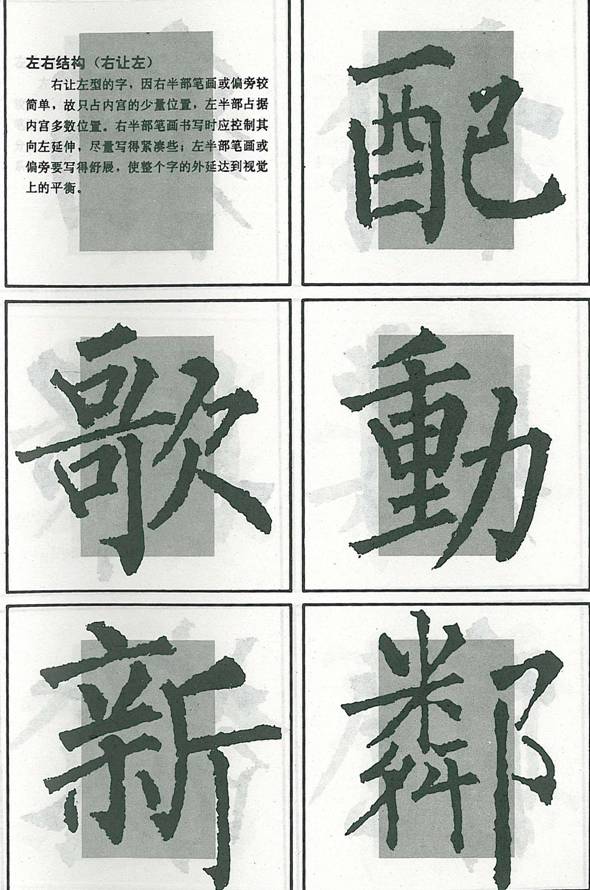
Structure—Two Equal Halves
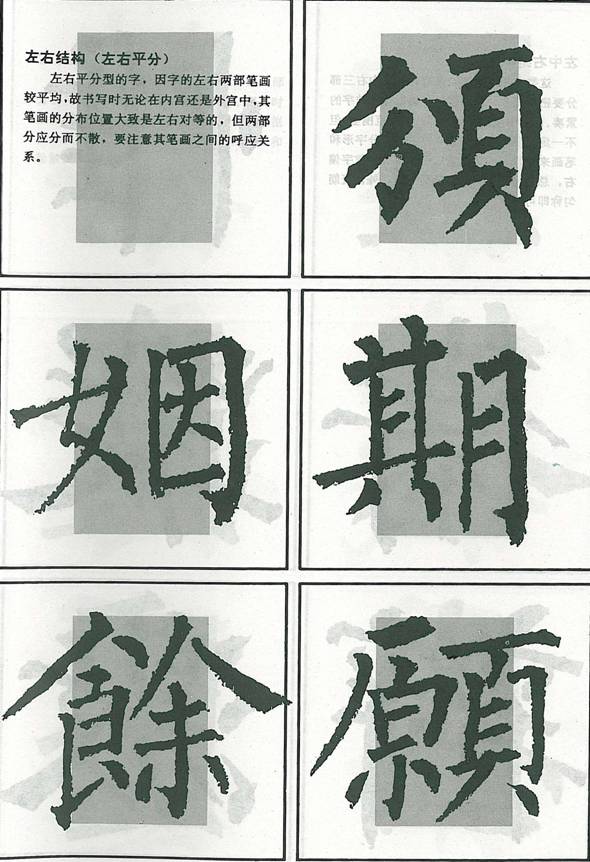 The space taken up by each part should be more or less the same; however, they should not look too loose, some strokes should also correspond to each other.
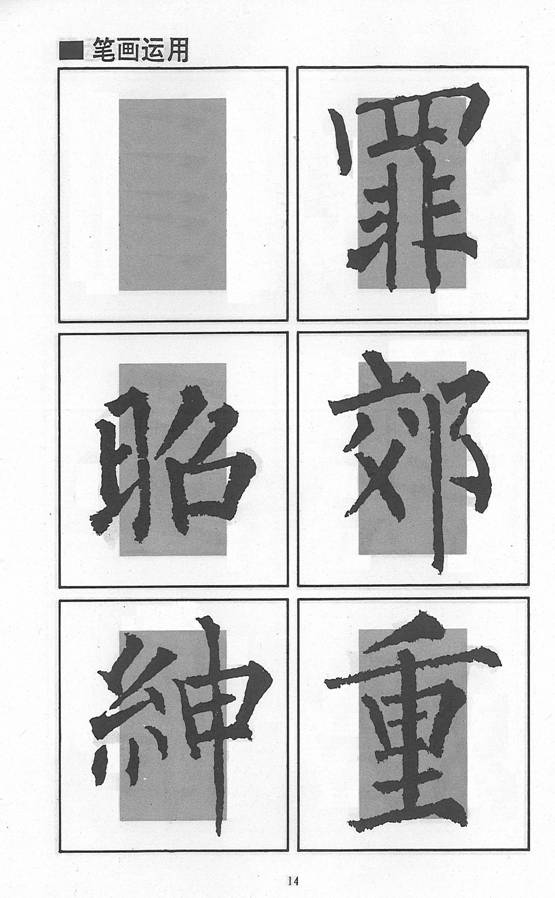
Structure—Left, Right and Middle Parts
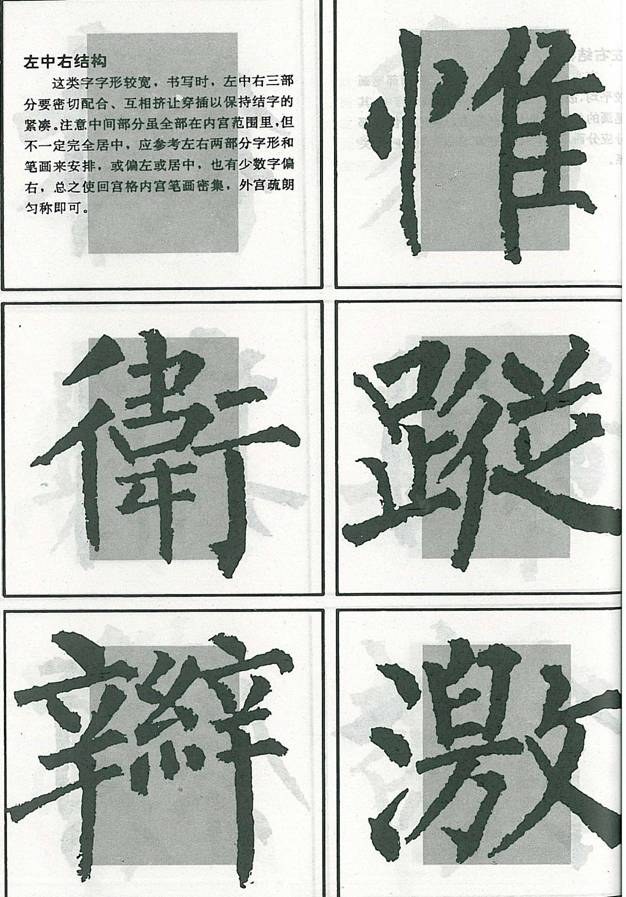 Since such characters look wider, all parts should be kept tightly together. All of the middle part is in the inner box, yet, it is not necessary to always keep it in the center, sometimes it is more to the left, and rarely more to the right.
 Most parts should be kept in the inner box. One feature of Liu’s style is that the upper part is tighter; but the entire character should not be written too long or too loose.
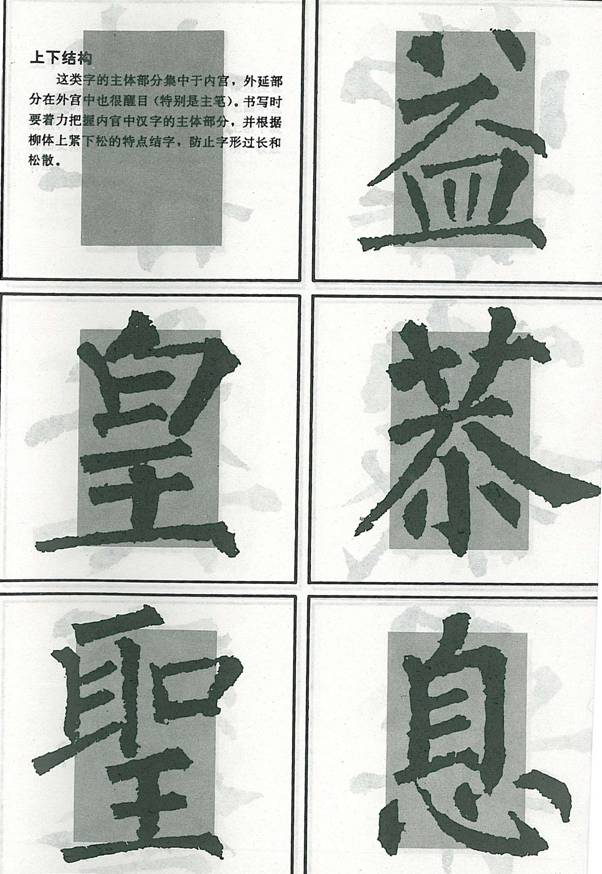
Structure—Upper, Middle and Lower
![]() Such characters are a bit longer, the verticals in the inner box should not be kept too long, horizontals should not be too bold; in Liu’s style, the upper part is tighter and the strokes are closer in the upper part.
Such characters are a bit longer, the verticals in the inner box should not be kept too long, horizontals should not be too bold; in Liu’s style, the upper part is tighter and the strokes are closer in the upper part.
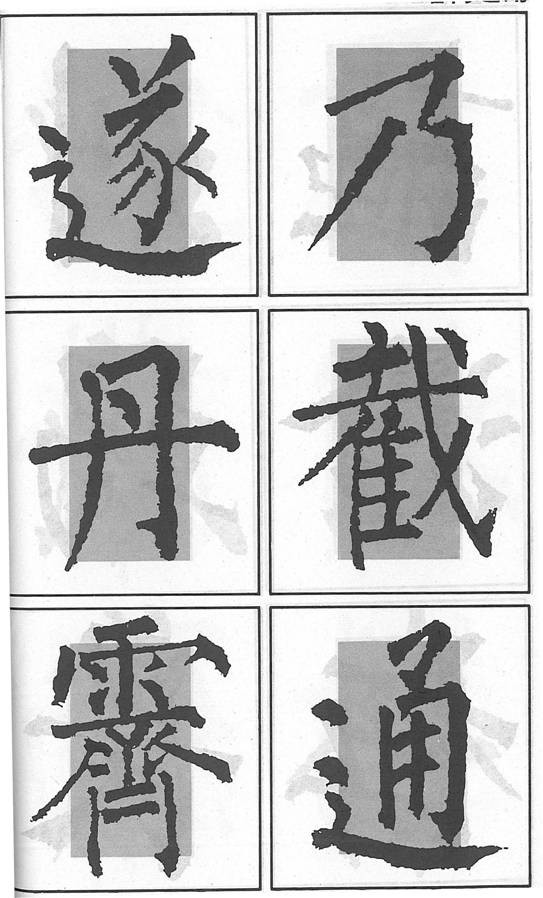
Structure—Enclosures
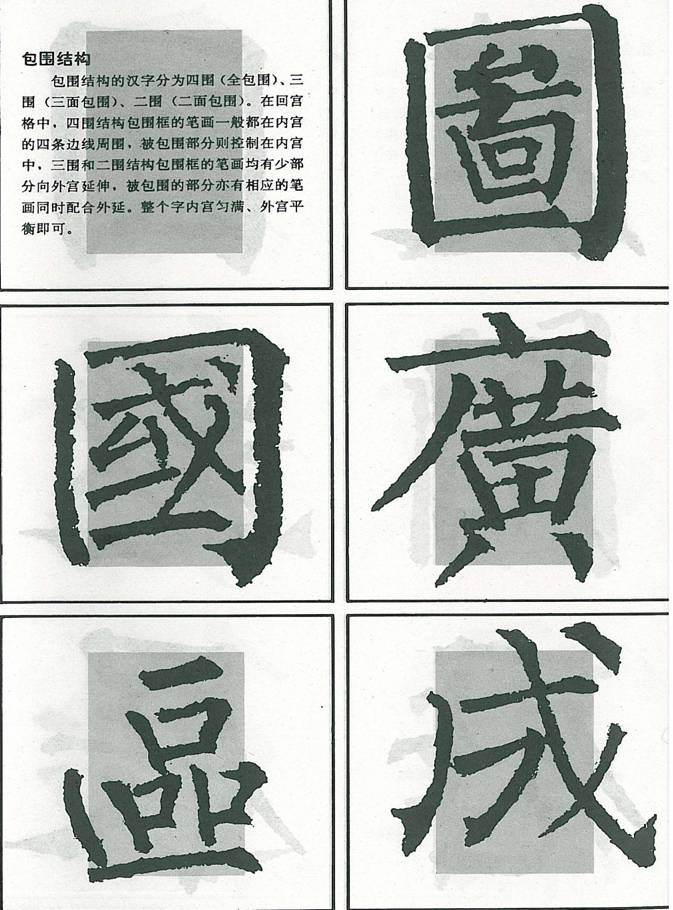 There are four, three and two sides enclosures. In four sides enclosures, the enclosing strokes should be kept along and close to the four sides of the inner box while the enclosed part is entirely in the inner box.
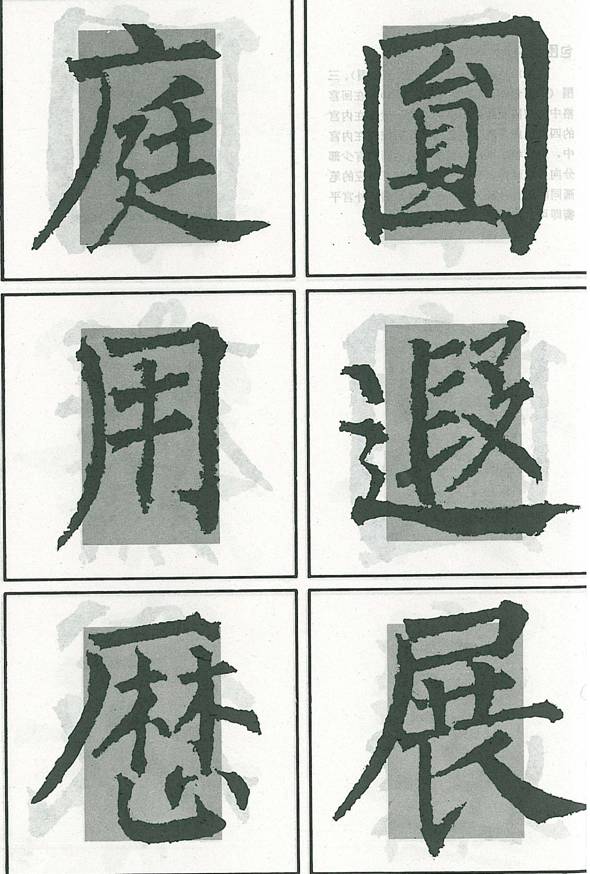 In three and two sides enclosures, a small part reaches out of the inner box, the inner box should look well balanced and full.
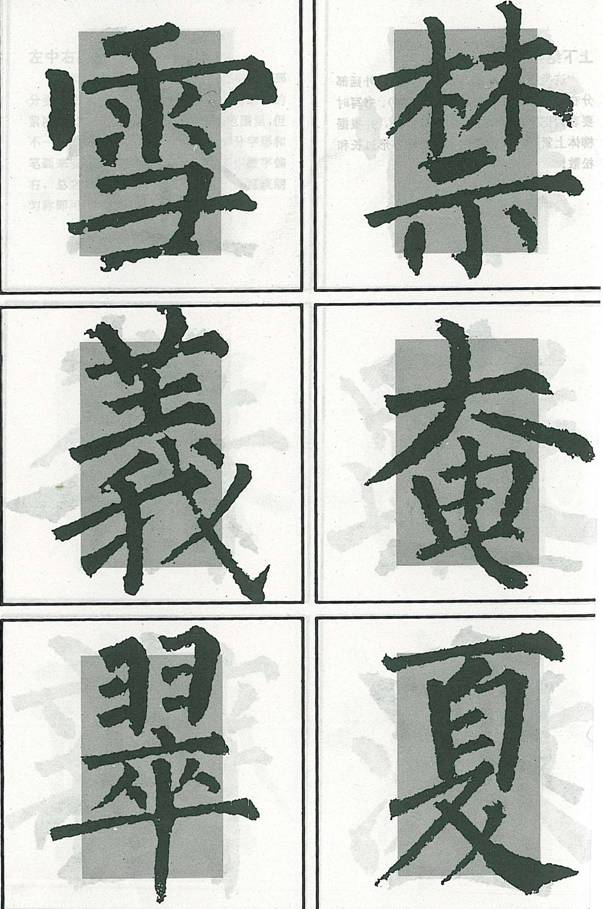
A Mixed Structure
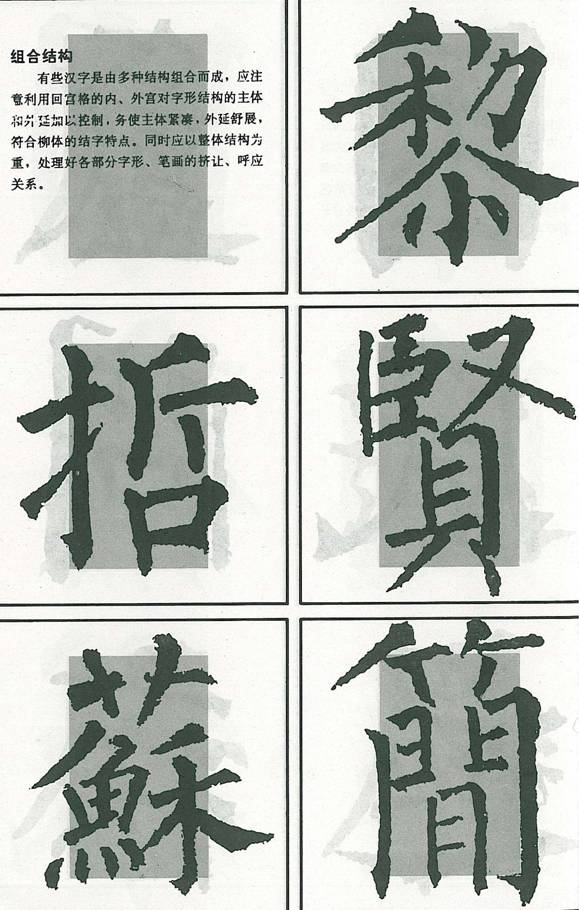 Some characters are of a mixed structure. Their main part should be kept tightly in the inner box, those extend out should look free and relaxed.
More to Structures
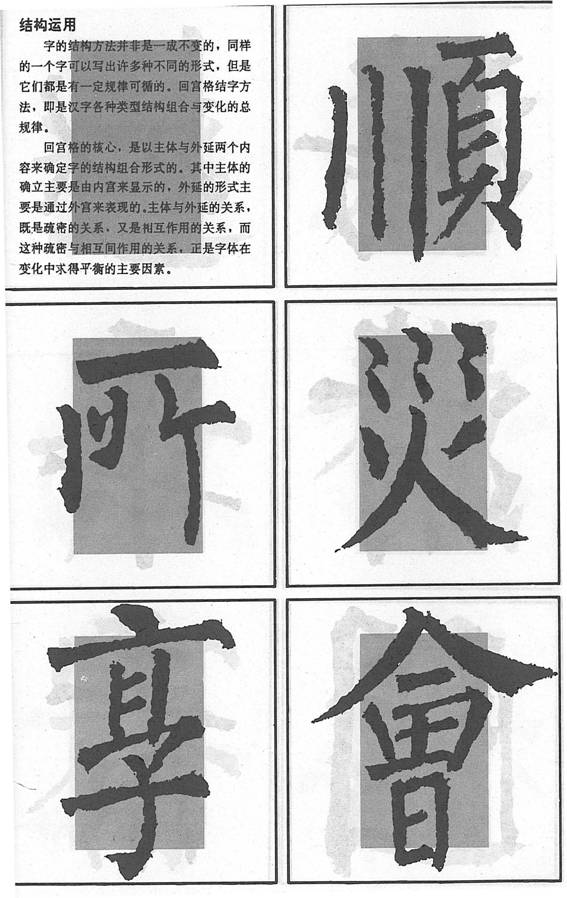 The two-box approach is a combination of the main body and extensions. The main body is in the inner box and extensions reach out of the inner box. The two affect each other, a balance must be sought.